Learning Microsoft Office 2007

Now learn Microsoft Office 2007 100% free

Learning Microsoft Office 2007

Now learn Microsoft Office 2007 100% free

Learning Microsoft Office 2007

Now learn Microsoft office 100% free

Pages

Make a Resume - How do i make a Resume - How do make a Resume on Word

 Make a Resume - How do i make a Resume - How do make a Resume on Word


The interesting and most useful tutorial of the day is How to Create a Resume in MS Word 2007. So as you all know that a “Resume” is a great need of very person so therefore today I started this tutorial. To make a “Resume” of your own information follow these steps which are given below.

1) Start “Microsoft Word 2007”
2) Click on “Page Layout” menu and then click on “Page Setup” dialog box as given below.


3) As you will click on “Page Setup” dialog box a menu will display. Now type (0.38) at the top, Bottom, Left and Right after that click “OK” as given below.


4) Now type these “header” and then “bold” it as given below.


5)Click after “Personal” header and then press an “Enter” from keyboard as given below.


6) Now click on “Page Layout” menu and then type (0) at the front of (Left, Right, Before and After) of “Indent and Spacing” as given below.


7) Now type these information at the below of “Personal” header as type below.
        Name:
        F/Name:
        Sex:
        Contact no:
        Email Address:
        Address:
        Driving License:

   
8) After that click after “Name” and use “tab” key from keyboard. Press “tab” key 3 or 4 times. After that Type your name and like this fill the other information which is below of Personal header as given below:


9) Now again click after “Profile” then press an “Enter” from keyboard and then go to “Page Layout” menu and then again type (0) value at the front of “After” from “Spacing” menu as given below:


10) Now writer about yourself at least 3 lines below of “Profile” as given below.

        
11) Now is turn of “Work experience”. To fill “work experience”, first of click after “Work Experience” then press an “Enter” from keyboard and then again go to “Page Layout” and fill (0) at the front of after in “Spacing” menu as given below.     


12) Now fill these below information at the below of “Work Experience” header as given below
            Date to Date:
            Company name:

 Type at the front of “Date to Date” the work of your years and then type the name of your company in that you have worked at the front of “Company” as given above.


13)  Now again bring your mouse pointer after of “Additional skill” and then click after it now press an “Enter”. Now go to “Page layout” and also write “0” values at the front of “After” from “Spacing” menu. Now fill the information about you “additional skill” as given below.


14) After “Additional skill” now we will fill information about “Educational details”.  Now again click after “Educational details” then press an “Enter” from keyboard and then go to “Page Layout” and fill “0” at the front of “After” from “Spacing” menu.
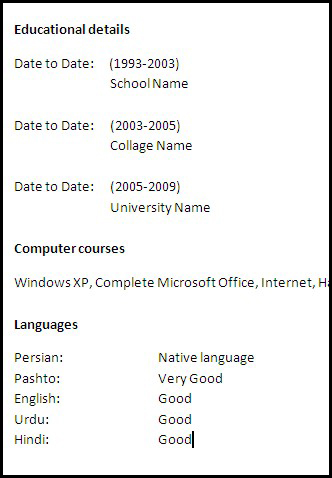
15) Now fill the below information at the below of “Educational details” as given below.


16) Type your “School name”, “Collage Name” and “University Name” at the below of your “join date” to School, College and University as given above.
17) Now is the turn of “Computer Courses”. First of all click after “Computer Courses” header then press a “Enter” from keyboard after that go to “Page Layout” and fill (0) value at the front of “After” in “Spacing” menu.
Now fill the names of those “computer courses” which you know write it at the below of “computer courses” as given below.


 18) Now is the last one header which is “Languages”. At the below of “Languages” you will write those “languages” which you know. First of all click after “Languages” header then press an “Enter” from keyboard after that go to “Page Layout” and fill (0) value at the front of “After” in “Spacing” menu.
Now write the name of Languages which you know at the below of “Languages” as given below. 


Now our Resume or CV has been created and i hope you all friends liked it


Link Word document - Link documents in Word - Create page to page Link

Link Word document - Link documents in Word - Create page to page Link

 This tutorial will show you how to make “Previous” and “Next” links between two or more pages. With the help of “Previous” and “Next” links you can go from one to another page. To make “Previous” and “Next” links in Microsoft Word 2007 follow these steps which are given below.
1) Start Microsoft Word 2007
2) Now click on “Save” command from “Office button” or click “Ctrl+S” from keyboard. After click on “Save” command type a name and click on “Save” button.
3) Now come to “Page 2” and Type “Next” as given below.

  4) Now select “Next” and click on “Copy” command from “Home” menu or click “Ctrl+C” from keyboard.
5) After click on “Copy” command click at the top of “Page 1”.
6) Now click on “Home” menu then click on “Paste” command and lastly click on “Paste as Hyperlink” as given below.

  7) As you will click on “Paste as Hyperlink” command a Link of “Next” will appear. Now hold “Ctrl” key from keyboard and then click on the “link”. As you will click on the “link” you will directly go the next page.
8) Now is the turn of “Previous” Link. To make “Previous” link write “Previous” at the top of “Page 1”.
9) Now select “Previous” as given below.


10) Now come to “Page 2” then clicks on “Home” menu and click on “Paste as Hyperlink” from “Paste” command.
11) Now like this make more links of “Previous” and “Next” above two pages. Our links have been created I hope you all friends like this tutorial. 
 

Find and Replace - Find and Replace in Word - Find and Replace in Word 2007

Find and Replace - Find and Replace in Word - Find and Replace in Word 2007

 The tutorial of the day is how to Find and replace your text in MS Word 2007. First we will work on “Find” command and then we will work on “replace” command. With the help of “Find” command we can Find a text in all of our document For example we have 3 pages in a document and now we want to search it so with the help of find command we can search a word and if you want to replace a name or word so then we can use Replace command. To use find command first of all follow these steps which are given below.

1) Start Microsoft Word 2007
2) Open a document with the help of “Open” command or click “Ctrl+O” from keyboard then select your document and lastly click on “Open” button.
3) As you open a document come to “Home” menu and then click on “Find” command or click “Ctrl+F” from keyboard as given below.


4) As you will click on “Find” command type a name and then click on “Find next” button as given below.

  
Replace:-
                              To replace your text follow the below option
1) Click on “Replace” command from “Home” menu or click “Ctrl+R” from keyboard.
2) Now type a word in “Find what” search and then click on “Replace what” and type a name as given below.

  
3) Now click on “Replace all” button and if you want to “replace” only that word which is selected now then click on “Replace” button.
This was tutorial of the day and I hope you all like this post    

Employee data sheet - Create a Data sheet

Employee data sheet - Create a Data sheet

 The tutorial of the day is “how to create an Employee datasheet in MS Excel”. Today we will work on an “Employee datasheet” and our work will depend on some functions which are SUM, COUNTIF, MAX and MIN. To start this interesting tutorial follows these steps which are given below.

1) Start “Microsoft Excel 2007”.
2) Write “SNo, Name, Position, Salary, Join date, Experience, Phone no and Address” at the top of Excel Row as given below.


3) Now select your text then “bold” and “color” your text and also make a “border” from “Home” menu as given below.


4) Now fill your information at the below of “SNo, Name, Position, Salary...” as given below.


5) Now choose “color” and “border” for your information text as given below.


6) Now select two cells down and then go to “Home” menu and then click on “Merge & Center” command as given below.


7) Now write “Total Salary” in this cell and use this function =Sum(D2:D11) at the front of this cell as given below.


8) After type of function press “Enter” from keyboard. Now like this fill these name at the below of “Total Salary” as given below.


9) Now type these function at the front of all your text as given below.


10) Fill the above functions one by one and your value will define as given below.


11) Now “color” and “bold” your text and also make “border” of your text as given below.


Copy and Paste - Copy to Clipboard - Paste from clipboard

Copy and Paste - Copy to Clipboard - Paste from clipboard

 The tutorial of the day is How to copy multiple characters, Words, Sentences, paragraph or Picture in MS Word, MS Excel, MS PowerPoint or in MS Access. We can use this tutorial in all courses of Microsoft Office but we will do our tutorial in MS Word 2007. To copy multiples items in MS Word 2007 or in other courses of Microsoft Office follow these steps which are given below.

1)  Start “Microsoft Word 2007”.
2) Open a document from “Open” command or click “Ctrl+O” from keyboard.
3) After open of document click on “Clipboard” dialog box as given below.


4) Now select your “text” or “picture” and then click on “Copy” command or click “Ctrl+C” from keyboard. As you will copy your “text” or “picture” it will appear in “clipboard” as given below.


5) Now select your “text” or “picture” and then click on “Copy” command or click “Ctrl+C” from keyboard. As you will copy your “text” or “picture” it will appear in “clipboard” as given below.  

One to One relationship - Relationship one to one - One to One relationship in Access

One to One relationship - Relationship one to one - One to One relationship in Access

 Relationship:-

Is a kind of “attribute” which connect two or more than two tables is called “Relationship”.
We have three kind of Relationship which are given below.
1) One to One
2) One to Many
3) Many to Many

One to One relationship:-

Number First we will work on One to One relationship that how we can make “Relationship” between One to One table and we will work on “Employee database” by the example of “One to One table”. With the help of one to one relationship we can divide a long table by two tables. To make a “relationship” between two tables follow these steps which are given below.
1) Start Microsoft Access 2007
2) Click on "Blank database" then give a name "Employee" and lastly click on "Create" button as given below.

 
 3) Click on "Create" Menu and then click on "Table Design" command. As you will click on "Table Design" command after that fills your information after that take "Primary key" of ID. To take the "Primary key" of ID right Click on "ID" and then choose "Primary key" you can also get "primary key" from "Design" Menu which is given below.

     
Notes: What is different between Text and Memo in data type column?
Text: - Text is a field of “data type” which contains up to 255 characters in a cell or the length set by “field size” property and “Memo” is also a field of “data type” which contains up 63,999 character. Its mean that whenever a sentence or paragraph which can write more than 255 character than we use “Memo” like information.
4) Click on “View” command and then choose “Datasheet view” from “Design” or “Home” as given below.


5) Then click “yes” and type a name for example “Employee” and lastly click “OK”.
6) Close the table from “close” button or click “Ctrl+W” from keyboard
7) Again click on “Create” menu and then click on “table design”. Now fill the information in another table which is given below.


8) Again click on “View” command and choose “Datasheet View” from “Design” or from “Home” menu. After click on “Datasheet view” click “yes” and “type a name” for example “Employee 2” then click “OK” and lastly choose no primary key.
9) Also close it from “close” button or click “Ctrl+W” from keyboard.
10) Now go to “Database Tools” menu and click on “Relationships” command as given below.


11) As you will click on “Relationships” command choose both of table by the help of “Ctrl” button and then click “Add” as given below.


12) After click on “Add” button then click “Close”.
13) Now drag the first “ID” which has “Primary key” to another “ID” as given below.


14) After dragging of “ID” the three options will appear. Checkup the first one and then click on “Create” button as given below.


15) Now press “Ctrl+S” from keyboard to save it and then close the display of Relationship with the help of “Close” button or click “Ctrl+W” from keyboard.
16) Now Open the first table “Employee” with double clicks or right clicks on it and then chooses “open”. As you will open your “Employee” table fills it by your own information as given below.


17) Now as you will fill your information a “plus sign” will appear at the 1st cell of ID as given below.


18) Click on “plus” sign and then fill your information.
            How to insert CV file?
            Right click on the first cell of CV and then click on “Insert object” as given below.

   
19) As you will click on “Insert object” a menu will display click on “Create from file” option and then click on “Browse” button now select your CV file then click OK and lastly also click OK.
Now like this also insert your Picture in picture column and fill your other information as given below.

        
This was our tutorial about One to One relationship in database and I hope you like this tutorial